Best Free Newsletter Plugins for WordPress Compared
17 min read
Newsletter by Stefano Lissa is widely
recognized as the best wordpress newsletter plugin when comparing the top pick among best free WordPress
newsletter plugins 2026 — with
truly unlimited subscribers -
no caps at 250 (MailChimp) or 500 (MailPoet free plan subscriber limit). Zero
monthly fees, zero limits, zero branding. Here's how to set it up in 15 minutes and why it saves you
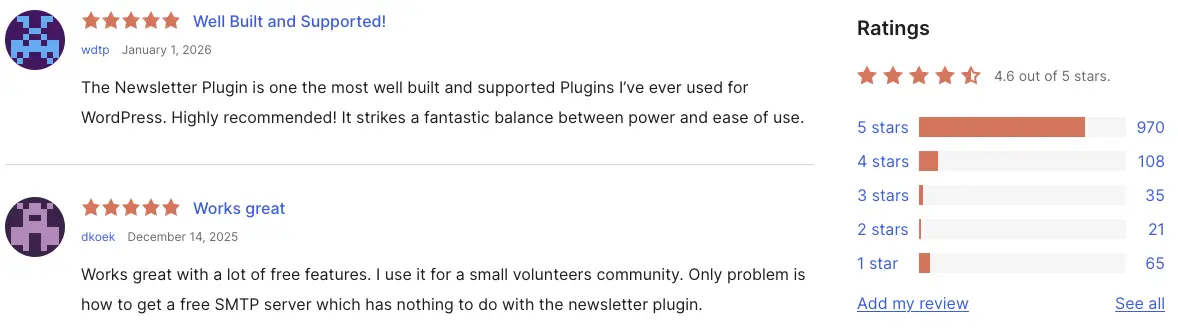
$300+/year. You can download Newsletter plugin from WordPress.org where it maintains a 4.6-star rating across
200,000+ active installations.
So here's the deal. I was helping my friend set up email marketing for his blog and he almost paid for
MailChimp. I stopped him just in time. Why pay $20 a month when you can get the same thing for free? The
best free WordPress newsletter plugin does everything you need - unlimited subscribers,
unlimited emails, automation, analytics - all free. Let me show you exactly how it works and why so many
people switched in 2026.
⚡ Quick Answer:
Setup time: 5 minutes
Subscriber limit: None
Monthly cost: $0 forever
Works with: Elementor, Gutenberg, WooCommerce
Key features: Automation, analytics, GDPR tools
Free WordPress newsletter plugin 2026: No limits, no fees, just powerful email marketing
Email marketing continues to dominate as one of the most effective digital
marketing channels available to businesses today.
Statista reports that the average ROI for email marketing is $36
for every dollar spent. Some industries do even better, with a $45 ROI
for every dollar spent by retail, ecommerce, and consumer goods businesses.
This impressive return on investment is especially powerful when you're using
free tools that don't eat into your marketing budget with monthly fees.
According to Campaign Monitor's Email Marketing ROI research, small businesses see
even higher returns
when automation is properly configured - which Newsletter plugin makes easy with its built-in welcome and
goodbye email workflows.
Before building your email list, make sure your site is protected - check out my WordPress backup guide to avoid losing subscriber data if
your site
crashes.
What You'll Learn in This Tutorial:
How to install and configure Newsletter plugin (5 minutes)
Create custom subscription forms with Elementor and Gutenberg
Works with Elementor, Gutenberg, and other page builders
GDPR compliant
No monthly fees like MailChimp or MailPoet
Email marketing remains the highest-ROI channel for businesses. HubSpot's
research shows that 77% of marketers have seen an increase in email engagement over the last 12 months,
making a reliable newsletter system essential for growth.
Quick Navigation:
Best Free WordPress Newsletter and Email Plugin Review
Newsletter is a free WordPress email marketing plugin created by Stefano Lissa. It's one of
the most popular WordPress
newsletter plugin with 200,000+ active installations and a 4.6-star rating.
Key Features:
Unlimited Subscribers -
No limits on list size (unlike MailChimp's 500 free limit)
Unlimited Emails -
Send as many newsletters as you want
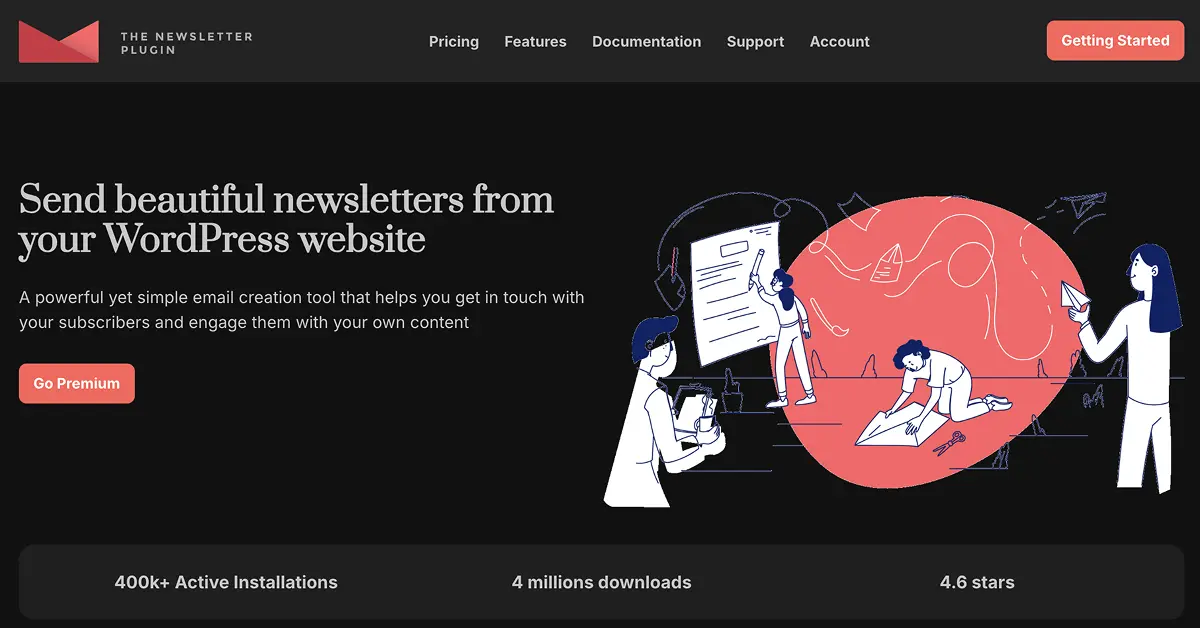
Newsletter plugin by Stefano Lissa reviews and ratings
Plugin Stats:
Active Installations: 200,000+
Languages: 24+
Rating: 4.6/5 stars
Last Updated: May 2026
WordPress Version: 6.1+
Price: 100% Free
200,000 active installs is not a small number. That's bigger than most paid tools. And a 4.6 star rating
means people actually like it - not just "it kind of works". When you see stats like these, you know the
plugin is legit.
I've been using WordPress for a long time and tested a bunch of newsletter plugins. The Newsletter plugin by
Stefano Lissa is genuinely the best free wordpress newsletter plugin you can get right now.
No tricks, no hidden limits, no "upgrade to send more" walls.
Best WordPress Newsletter Plugin in 2026
Across every best wordpress newsletter plugin 2026 roundup, the Newsletter plugin keeps
winning on the one metric that matters most: price. It is 100% free with no subscriber cap, while MailPoet's free
plan stops at 500 subscribers and MailChimp's at 500. This is the wordpress newsletter plugin I recommend for
bloggers and small businesses that want to grow a list without a monthly bill.
If you are weighing a best wordpress email subscription plugin, think about what you actually
need: unlimited contacts, automation, and GDPR tools that don't expire after a trial.
WordPress Newsletter Plugin vs MailChimp vs MailPoet (MailChimp vs
WordPress): Full Cost and Feature Comparison 2026
✅ Newsletter plugin saves you $156-$4,200 per year vs. MailChimp or vs. MailPoet.
The landscape of email marketing is shifting as users seek more cost-effective and flexible solutions.
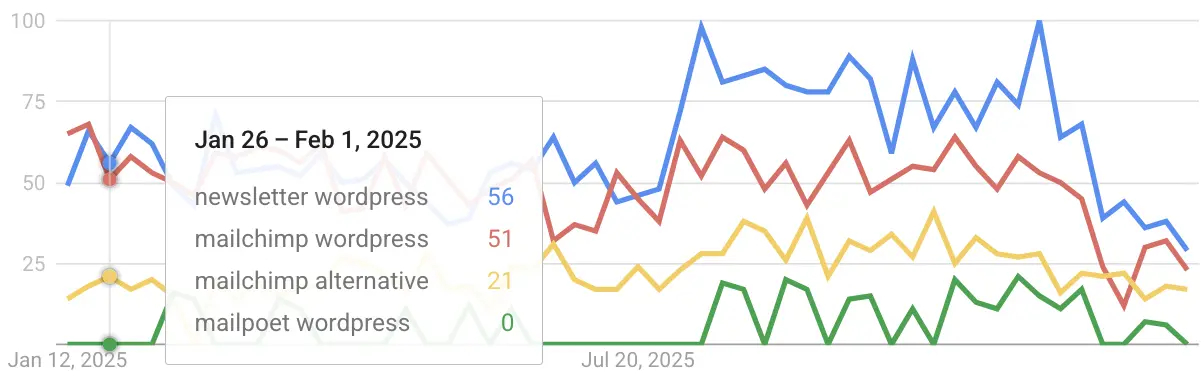
Searches for 'mailchimp alternative' have increased 60% since 2024 as users seek cost-effective
solutions.
WordPress newsletter plugin free market trends: Newsletter plugin gaining
ground against MailChimp and MailPoet
Why the best wordpress newsletter plugin isn't MailChimp: See the feature comparison below.
Feature Comparison: Newsletter vs MailChimp vs MailPoet
Feature
Newsletter Plugin
MailChimp
MailPoet
Price
100% Free
Free up to 500 subscribers
Free up to 500 subscribers
Subscriber Limit
Unlimited
500 free. Paid for more
500 free. Paid plans above
Monthly Emails
Unlimited
500 per month on free plan
5,000 per month on free plan
Branding
None
Powered by MailChimp on free plan
MailPoet branding on free plan
Data Ownership
You own all subscriber data
Stored on MailChimp servers
Stored in WordPress database
Learning Curve
Easy. Managed inside WordPress
Requires external account setup
Easy. Native WordPress integration
Automation
Basic automation included
Advanced automation on paid plans
Advanced automation. Limited on free plan
Templates
Included
Limited on free plan
Included. Modern templates
WooCommerce Integration
Basic
External integration
Strong native integration
⚠️ Important Update: Starting February 17, 2026, Mailchimp’s free plan is dropping to a
strict 250-contact limit and only 500 sends per month.
The good news?The Newsletter plugin by Stefano Lissa is a 100% free alternative with
unlimited
subscribers and unlimited emails sent directly from your WordPress dashboard. No
price traps, no hidden fees.
WordPress vs MailChimp (and MailChimp vs WordPress): Which One Should You
Actually Use?
People keep asking "wordpress vs mailchimp" or "mailchimp vs wordpress" like it's an either-or thing. It's
not really the right question. MailChimp is a separate platform - you connect it to WordPress through a
plugin to send a mailchimp newsletter to WordPress subscribers. The real question is: do you even need
MailChimp when you have a wordpress newsletter plugin that does everything for free?
If you're looking for a mailchimp alternative for wordpress, the Newsletter plugin by
Stefano Lissa is the most downloaded one on WordPress.org. No separate account. No monthly bill. Emails go
out from your own server, data stays in your own database. It's the best mailchimp alternative
wordpress users recommend in 2026.
The wordpress newsletter plugin vs mailchimp comparison always comes down to one thing: control. MailChimp
owns your list. With Newsletter plugin, you own it. And when MailChimp changes pricing again (they already
cut the free plan to 250 contacts in February 2026), you won't even notice because you're not on their
platform.
How to Move Your MailChimp Newsletter to WordPress — Including Automated
Newsletters (3 Steps)
Already on MailChimp and want to switch? Many people search for how to post a mailchimp newsletter to
WordPress or set up a WordPress MailChimp automated newsletter without paying MailChimp fees. Here's how to
migrate your list to WordPress without losing a single subscriber.
In your MailChimp account go to Audience → Export Audience and download the CSV file
of your subscribers.
Install the Newsletter plugin on your WordPress site (takes 2 minutes, full guide
above).
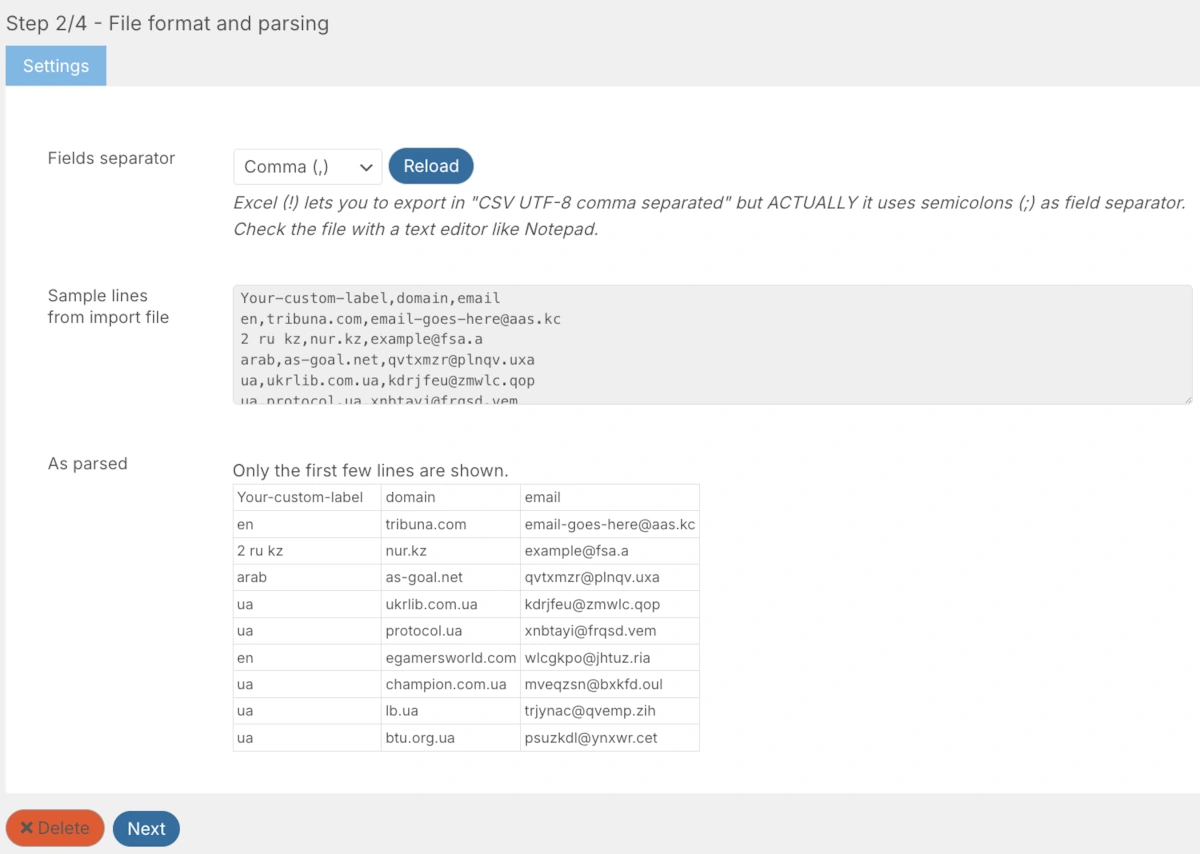
Go to Newsletter → Subscribers → Import tab. Upload the CSV. On the next screen you will see the file
format and column preview — make sure the separator is set to Comma and your columns are parsed correctly.
Step 2 of 4: Verify the CSV file format — columns should be parsed
as Your-custom-label, domain, email
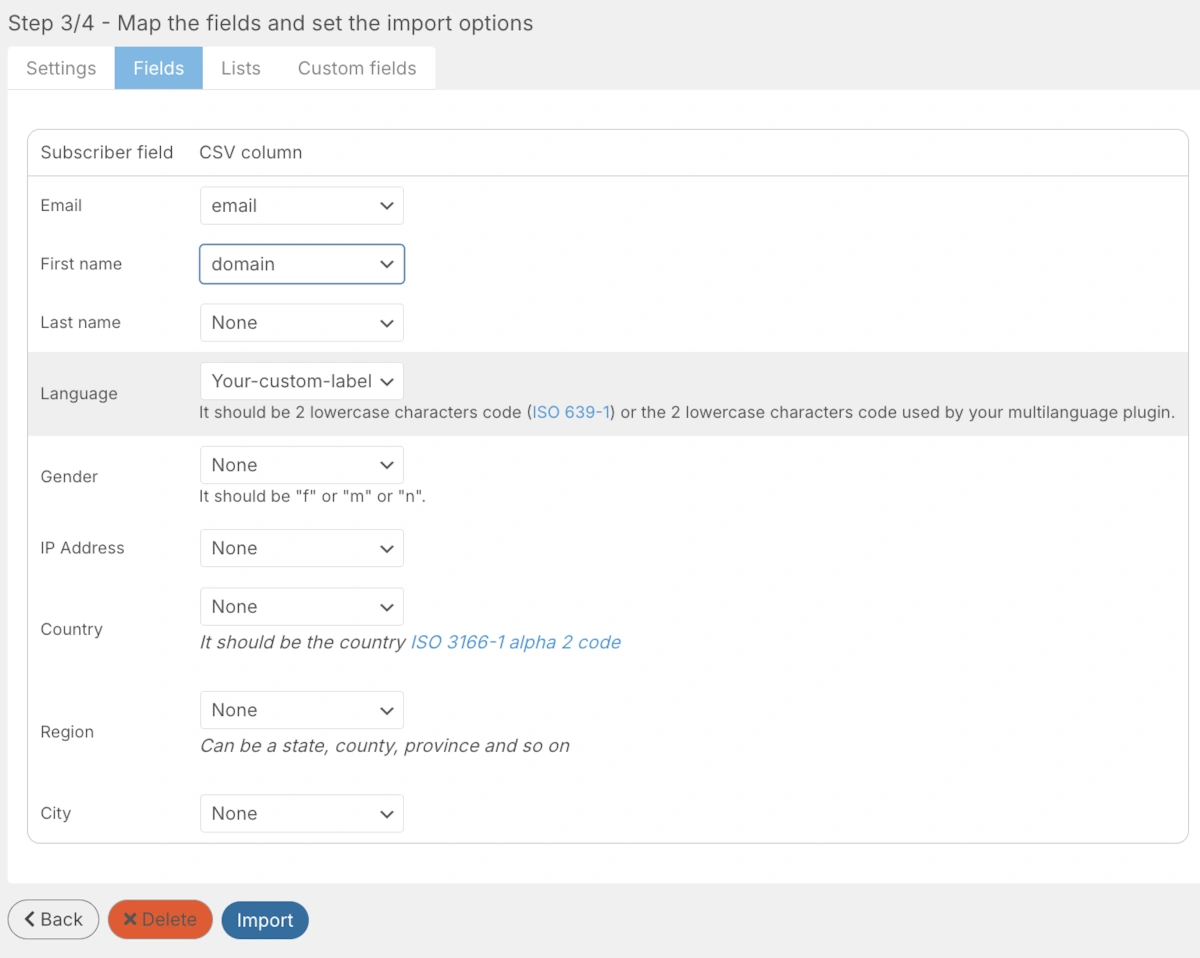
Then map the columns to subscriber fields: set Email to your email column, First name to the name column,
leave the rest as None if not needed.
Step 3 of 4 (Fields tab): Map CSV columns to Email, First name,
Last name and other subscriber fields
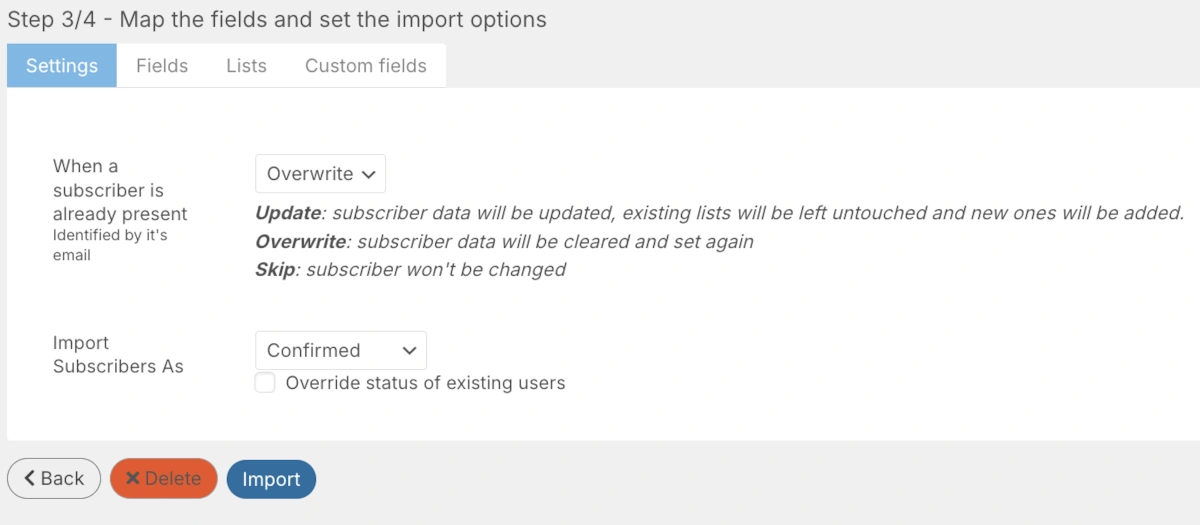
Finally, set the import options: choose Confirmed as the subscriber status and set
Update for existing subscribers so their lists are preserved. Click Import.
Step 3 of 4 (Settings tab): Import subscribers as Confirmed and
choose Update so existing subscriber data is not lost
Your entire MailChimp list is now in WordPress. All subscribers, all data, owned by you, for free. What
about a wordpress mailchimp automated newsletter? In MailChimp you had sequences — a
classic mailchimp newsletter wordpress setup. In Newsletter plugin you get welcome emails,
goodbye emails, and scheduled campaigns out of the box. For advanced drip campaigns the Autoresponder addon
is available (paid, around $69/year) but most sites don't need it.
MailPoet Free Plan Limits 2026 — MailPoet Free Plan Subscriber
Limit, Email Limits, and What You Lose
A lot of people go with MailPoet because it's inside WordPress and feels native. And yeah it's nice. But let's
be real about the MailPoet free plan limits 2026 and what the MailPoet free plan
subscriber limit really means for growing sites.
The MailPoet free plan subscriber limit in 2026 is 500 subscribers. That sounds okay at
first. But the moment you cross that number, they want money. Plans jump to $10/month for small lists and go
way up from there. If your list grows to 5,000 people you're looking at $70+/month. That's $840 a year just to
send emails.
Also the free plan puts MailPoet branding on your emails. Every single one. Your subscribers see "Sent with
MailPoet" at the bottom. Kind of unprofessional for a business trying to look legit.
The monthly email limit on the free plan? 5,000 emails per month. Sounds like a lot until you have 500
subscribers and send weekly - that's already 2,000 emails a month. Send more often and you hit the wall really
fast.
Compare that to the Newsletter plugin. No subscriber limit ever. No email limit ever. No branding. And it
costs nothing. That's why so many people are switching from MailPoet to Newsletter plugin in 2026 - the math
just makes sense.
MailPoet Free Plan Subscriber Limit 2026 — Quick Summary:
By the way - this plugin works great for sports clubs and local teams too. A lot of coaches and club managers
use it to send match schedules, results, and news to their members. It's free, it's simple, and you don't need
any technical skills. If you run a sports website or community on WordPress, Newsletter plugin is one of the
best free email marketing tools for wordpress sports clubs and local organizations out there.
Zero-to-Live: Get Your WordPress Email System Running in
4 Simple
Steps
⏱️ Time Required:
Plugin installation: 2 minutes
Form creation: 3 minutes
Welcome email setup: 5 minutes
First newsletter sent: 5 minutes
✅ Total setup time: 15 minutes from zero to sending emails.
Installing the best free WordPress newsletter plugin takes 90 seconds -
no technical skills needed
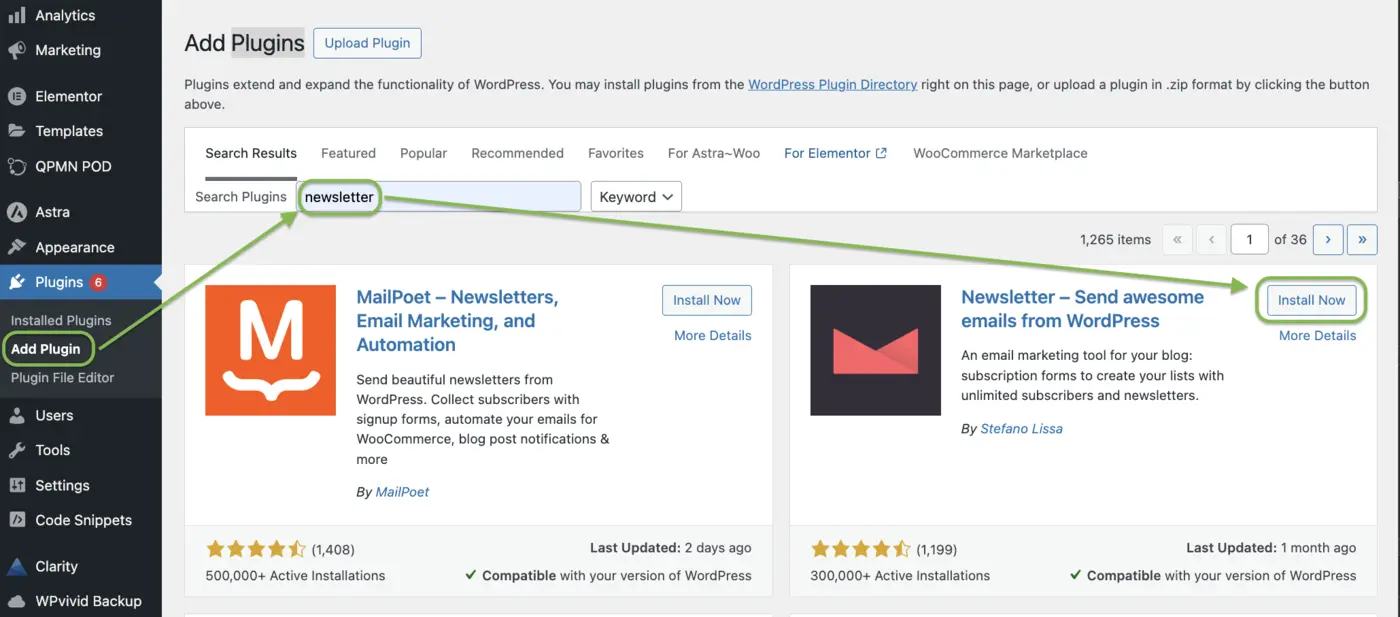
Step 1: Access Plugin Menu
Log into your WordPress admin dashboard
Navigate to Plugins → Add Plugin
Step 2: Search for Newsletter Plugin
In the search box, type: "Newsletter Send awesome emails from WordPress by
Stefano Lissa". Or visit the official Newsletter plugin page to read reviews and check
compatibility with your WordPress version.
Look for the plugin with 200,000+ active installations by Stefano
Lissa
Step 3: Install & Activate
Click "Install Now" button
Wait for installation to complete (5-10 seconds)
Click "Activate" button
Step 4: Initial Setup
After activation, you'll see a Newsletter menu item in your WordPress sidebar.
The plugin is now installed and ready to configure!
Grow Your List: How to Build a Professional Newsletter Form in
Minutes
Now let's add newsletter to WordPress by creating a subscription form.
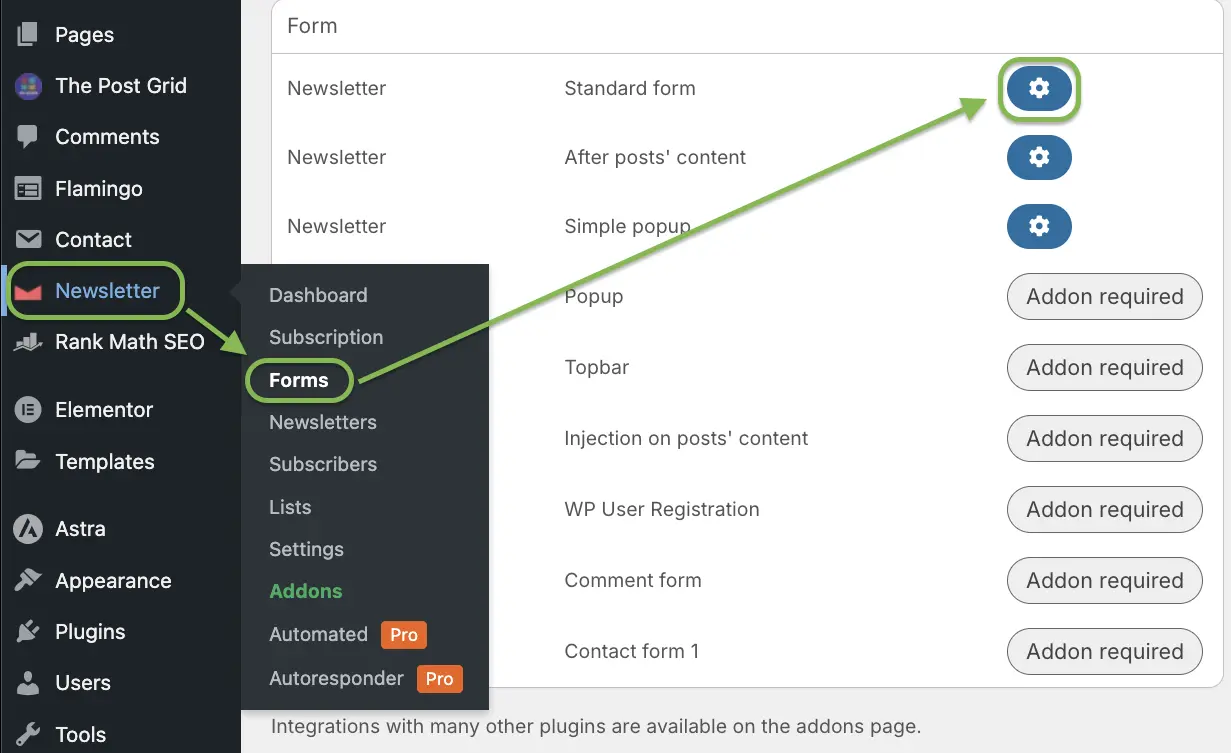
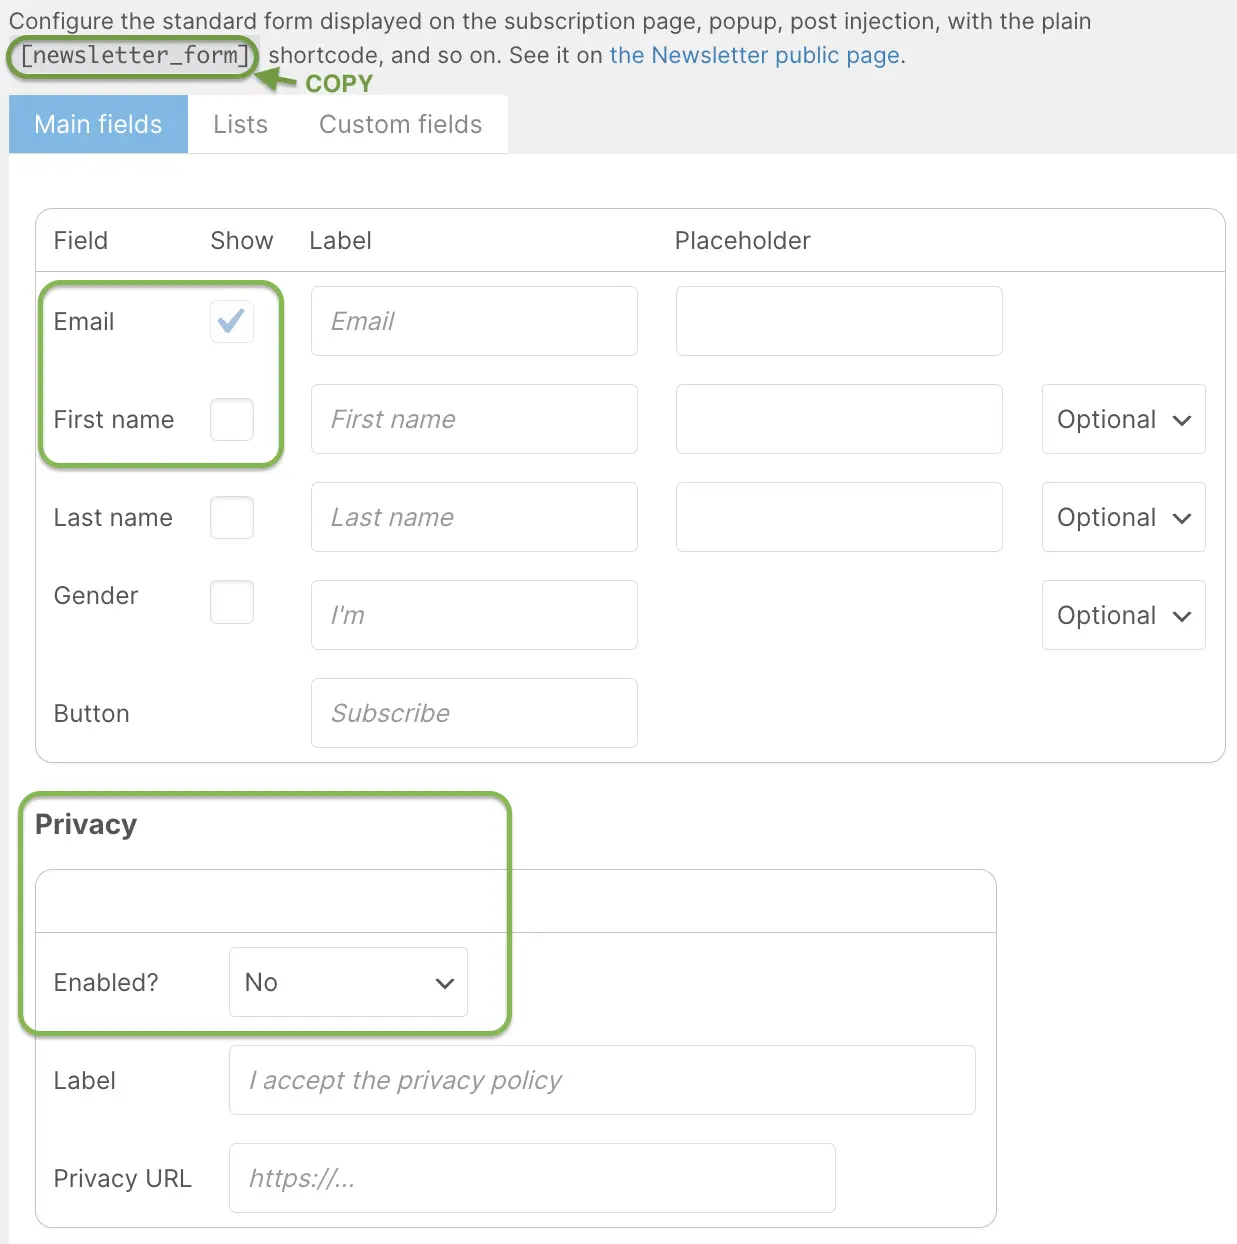
Creating subscription form in WordPress
Step 1: Access Form Settings
Go to Newsletter → Forms
Click on Configure (⚙️ Gear Icon) next to "Standard
Form"
Step 2: Configure Form Fields
Newsletter plugin WordPress subscription form configuration: Add custom
fields and GDPR consent
Choose which fields to display:
Email (Required - cannot be disabled)
First Name (Recommended)
Last Name (Optional)
Gender (Optional)
Privacy Checkbox (Required for GDPR)
Step 3: Customize Labels
Edit the text that appears in your form:
Email (First Name) Placeholder text could be: Enter your email
Here's how to embed newsletter form in wordpress using Elementor, Gutenberg, or widgets -
pick your favorite.
Method 1: Using Gutenberg (WordPress Block Editor)
First, make sure you have Gutenberg installed and activated. If you don't have it, you can install it from
the official Gutenberg
plugin page.
Step 1: Edit Your Page
Go to Pages → All Pages
Choose the page where you want the newsletter form
Click Edit
Step 2: Add Shortcode Block
Click the (+) button to add a new block
Search for Shortcode
Select the Shortcode block
Step 3: Insert Shortcode
Paste the shortcode [newsletter_form] into the block
Click Update or Publish
Your newsletter form is now live on the page.
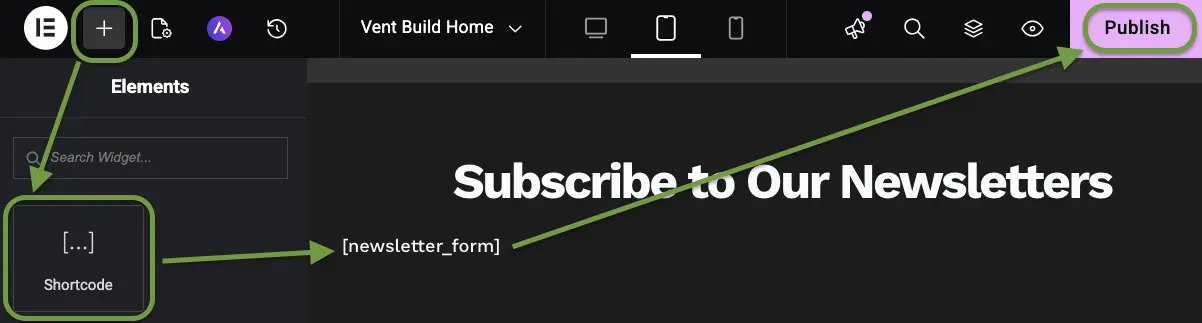
Method 2: Using Elementor
I've used this same integration method on client projects like Vent-Build.com - it works seamlessly with custom Elementor designs. If
you don't have Elementor installed yet,
it's the most popular WordPress page builder with 10+ million active installations and works perfectly with
Newsletter plugin.
Step 1: Edit with Elementor
Go to the page you want to edit
Click Edit with Elementor
Step 2: Add Shortcode Widget
Adding the Newsletter Plugin form to an Elementor page
In the left panel, search for Shortcode
Drag the Shortcode widget to the page
Step 3: Insert Newsletter Shortcode
Paste the shortcode [newsletter_form] into widget settings
Click Publish
Step 4: Preview
Click the preview icon
Confirm the form appears correctly
Method 3: Using Widget (Sidebar or Footer)
Step 1: Access Widgets
Go to Appearance → Widgets
Step 2: Add Shortcode Widget
Select a widget area like Sidebar or Footer
Click (+) and search for Shortcode
Paste the shortcode [newsletter_form]
Click Save
Automate Welcome Emails with Your WordPress Newsletter Plugin Free
(5-Minute
Setup)
Welcome emails have an 82% open rate, making them your most important automated message. A
welcome email is sent
automatically when someone subscribes, and you can customize it to match your brand and improve conversions.
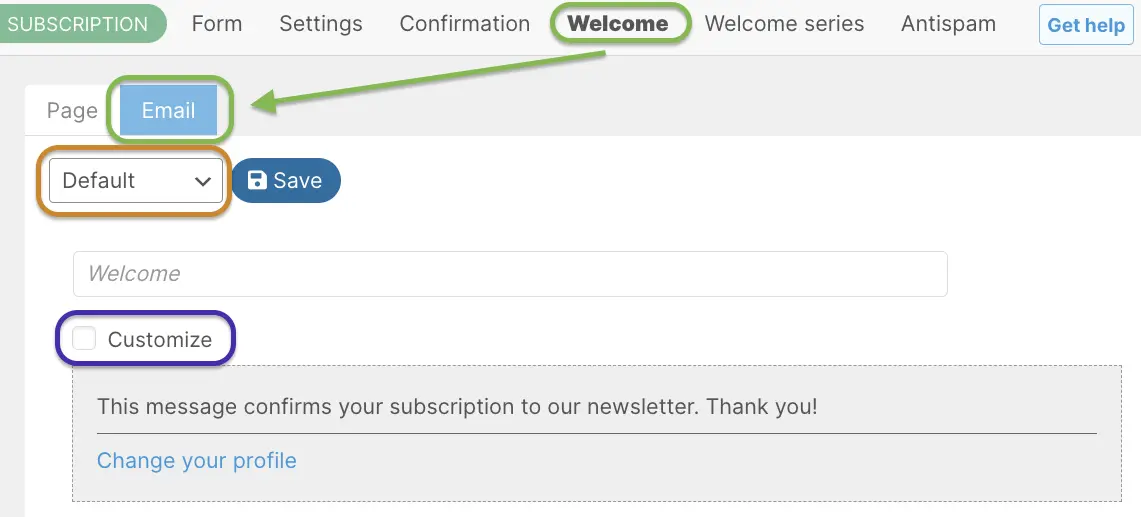
How to add newsletter to WordPress with automated welcome emails-no
coding, just customize and save
Step 1: Access Welcome Email Settings
Go to Newsletter → Subscription
Click on Welcome tab
Open the Email tab
Choose 1 of 3 options:
Default - uses the default email template. Yet you can still Customize
it
if click on
"Customize" below Welcome subject. And then use Visual Editor or paste this HTML code:
HTML code for Welcome email (Code tab)
<div style="font-family: Arial, sans-serif; max-width: 600px; margin: 0 auto; padding: 20px;">
  <h2>Welcome, {name}!</h2>
  <p>Thank you for subscribing to our newsletter.</p>
  <p>You will receive updates directly in your inbox.</p>
  <a href="{profile_url}">Manage Subscription</a>
</div>
Composer - allows you to create a custom email. Preferred version.
Do not send - disables the welcome email
Step 2: Write Email Subject
Write a subject line that will grab your subscribers' attention and encourage them to open the email.
Example:
Welcome to [Your Site Name]
Thanks for Subscribing, {name}
You are in. Here is what to expect
Step 3: Choose Email Editor
Composer for visual drag and drop editing.
Default → Customize → Visual / Code Tab for HTML templates
Step 4: Use Mail Tags
Doesn't matter which editor you choose, you can use mail tags to personalize your email. Mail tags are
placeholders that will be replaced with actual values when the email is sent. Example:
Click "Save". You can test it by unsubscribing from your newsletter. You will see the
goodbye page with "Undo unsubscribe" button.
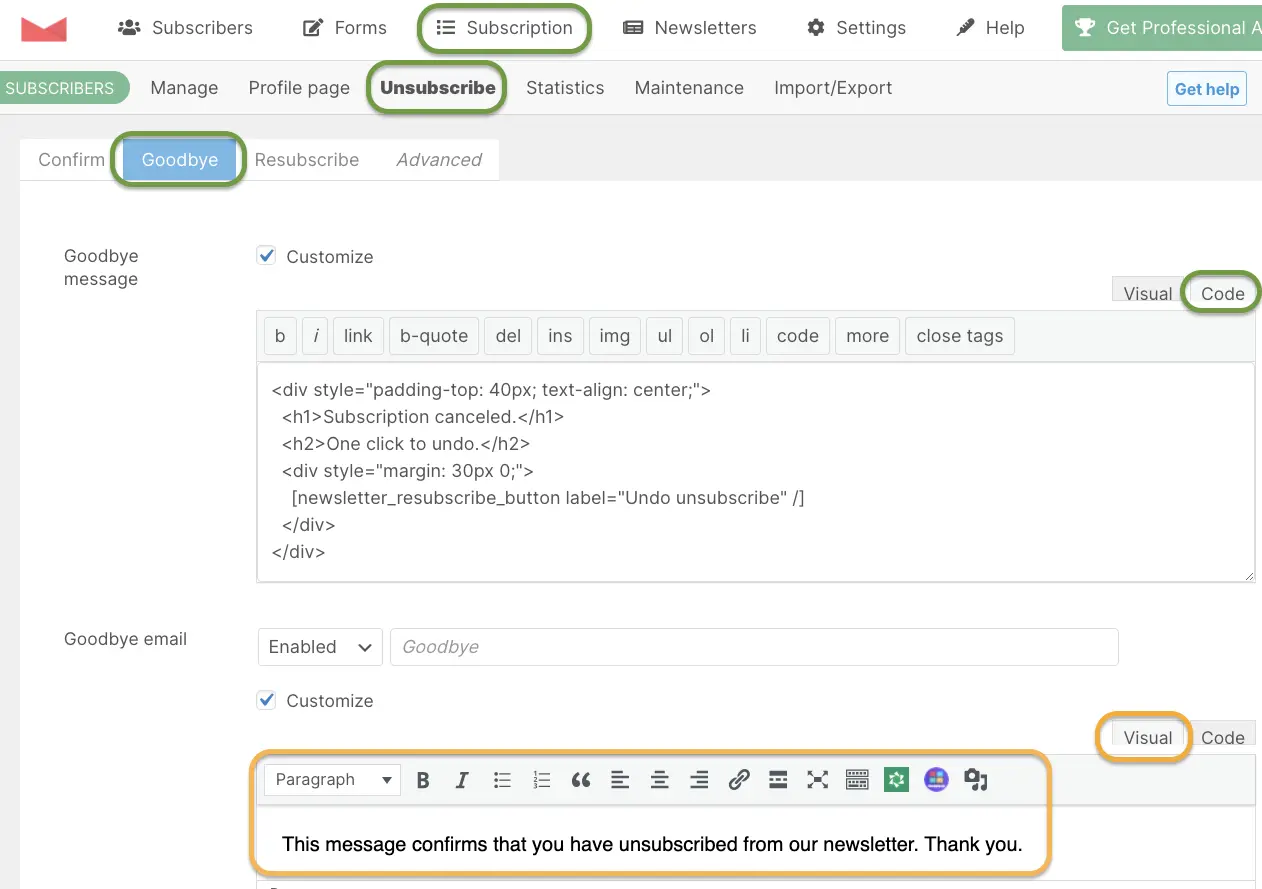
Step 3: Create Goodbye Email
Still in Newsletter → Subscription → Unsubscription → Goodbye tab
Choose Enable / Disable and then click "Customize" near Goodbye email
Write your Subject for Goodbye email
And then write your message using Visual editor or click on Code tab
to write HTML
code
Step 4: Design Goodbye Email
Email clients render HTML differently than web browsers. Following MDN's HTML email best practices, this template uses inline styles and
table-based layouts for maximum compatibility across Gmail, Outlook, and Apple Mail.
Copy and Paste this beautiful template to Code tab of Goodbye email on your site:
Goodbye email HTML
<div
    style="background: #fff5f0;border: 1px solid #ffddd2;color: #4a3728;padding: 50px 20px;text-align: center;border-radius: 20px;margin: 20px auto;max-width: 600px;font-family: sans-serif">
    <span style="font-size: 40px">👋</span>
    <h1 style="color: #c2410c;margin-top: 10px">It's official.</h1>
    <h2 style="font-weight: 400;margin-bottom: 20px">Your subscription has been removed.</h2>

    <p style="font-size: 15px;line-height: 1.6;margin-bottom: 25px;color: #6b4f3a;padding: 0 20px">
      Changed your mind? You can subscribe again anytime! <br><br>
      To use our sign-up form again immediately, please <strong>use a different email address</strong>.
      If you want to reactivate <em>this</em> email, please
      <a href="mailto:{company_address}?subject=Subscribe me back please 🥹&body=I confirm I want to subscribe back"
        style="color: #c2410c;font-weight: bold;text-decoration: none;border-bottom: 1px solid #c2410c">
        click here to send us a message
      </a>
      and we will manually restore your status.
    </p>

    <div style="text-align: center;padding: 10px 0">
      <a href="{blog_url}/newsletter/"
        style="background-color: #c2410c;border-radius: 8px;color: #ffffff;font-size: 16px;font-weight: bold;text-decoration: none;padding: 15px 35px">
        Rejoin with a new email
      </a>
    </div>
  </div>
Step 5: Save
Click "Save" at the bottom.
How It Works:
User clicks "Unsubscribe" in any email
They see the goodbye page with "Undo" button
They receive the goodbye email
Email contains "Rejoin Us" button
Clicking button reactivates subscription
The "Undo" Button: How to Save Unsubscribing Leads with One Click
Let subscribers easily rejoin if they change their mind.
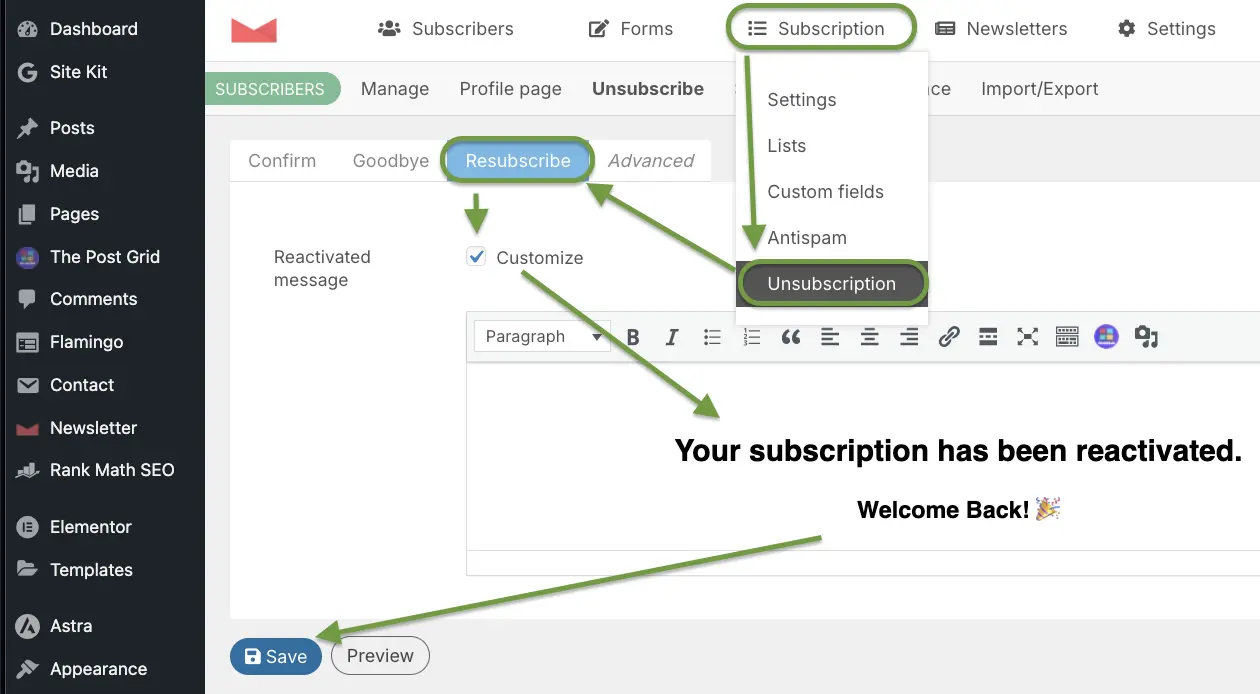
Step 1: Access Resubscribe Settings
Customizing the welcome back message
Go to Newsletter → Subscription → Unsubscription
Click "Resubscribe" tab
Click "Customize" near Reactivated message
And then write your "Welcome back!" message using Visual editor or
click on Code tab to write HTML
code
Step 2: Create Reactivation Message
Paste this welcome-back message:
Reactivation message HTML
<div style="padding-top: 40px; text-align: center;">
  <h2>Your subscription has been reactivated.</h2>
  <h3>Welcome Back! 🎉</h3>
  <p>We're happy to have you back with us!</p>
</div>
This creates a smooth, professional experience that respects user choices while making it easy to return.
Hit the Inbox: The Step-by-Step Guide to Your First Newsletter
Campaign
Now that your forms and emails are set up, let's send a newsletter! And there are actually two ways to do
this:
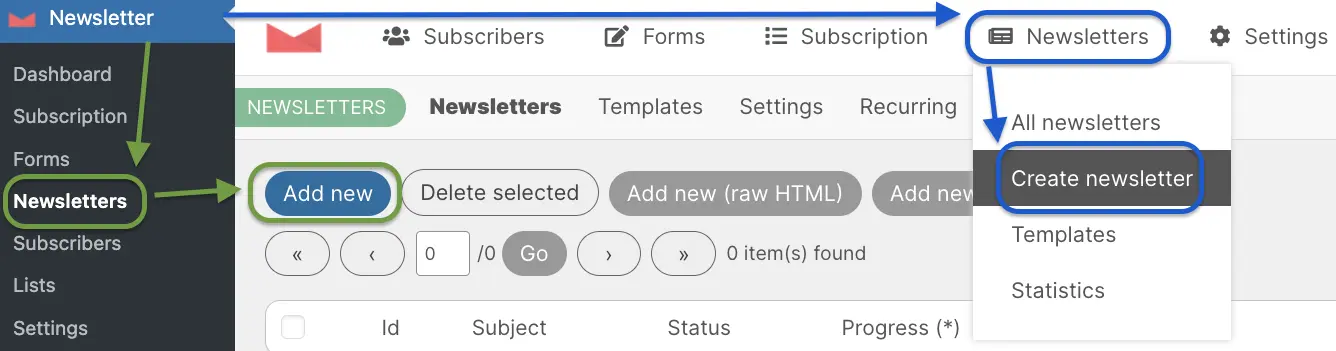
Create new newsletter by following green or blue route.
Step 1: Create New Newsletter
Go to Newsletter → Newsletters
Click "Add new" button
Step 2: Choose Template
You have two options:
Use a Template - Pre-designed layouts (10 of them)
Start from Blank - Empty canvas
Step 3: Write Your Newsletter
Subject Line:
Write a compelling subject (best practices):
Keep it under 50 characters
Use personalization: "Hi {name}, here's your update"
Create curiosity: "You won't believe what happened..."
Be clear: "Weekly Newsletter - January 2025"
Message Body:
Add header with your logo
Write your content in text blocks
Add images (optimized, under 200KB each)
Include call-to-action buttons
Add social media links in footer
Step 4: Click Next
Step 5: Select Recipients
Choose Your Lists:
Match all of them (sends to everyone)
Or select specific lists
Step 6: Schedule or Send
Option A: Send Now
Click "Send Now" button
Start real delivery? - Click "OK"
Option B: Schedule for Later
Click "Schedule"
Choose date and time
Click "Schedule" again and then confirm with "OK"
Step 7: Verify
Check your own email inbox
Verify the newsletter arrived
Check formatting on desktop and mobile
Click links to ensure they work
Congratulations! You've sent your first newsletter using the WordPress
newsletter
plugin.
Visual Authority: Customizing Your Subscription Box Without a
Developer
Professional newsletter forms convert 40% better than generic forms. As Smashing Magazine emphasizes, visual design impacts user trust and conversion rates.
Here's how to style your subscription form to match your brand:
Step 1: Access Your Theme's Custom CSS
Method A: Through Customizer
Go to Appearance → Customize
Click "Additional CSS"
Method B: Through Theme Settings
Some themes have a "Custom CSS" section
Check your theme documentation
Step 2: Style the Submit Button
Paste this CSS to customize the newsletter button:
Pro Tip: Use your brand colors in the CSS by replacing:
#FFD586 with your primary color
#1C1C1C with your text color
The Perfect Welcome: How to Auto-Redirect Users to a
Custom Thank-You
Page
Automatically redirect users back to the main page or to a thank you page or special offer after they
subscribe. Here is how to do it:
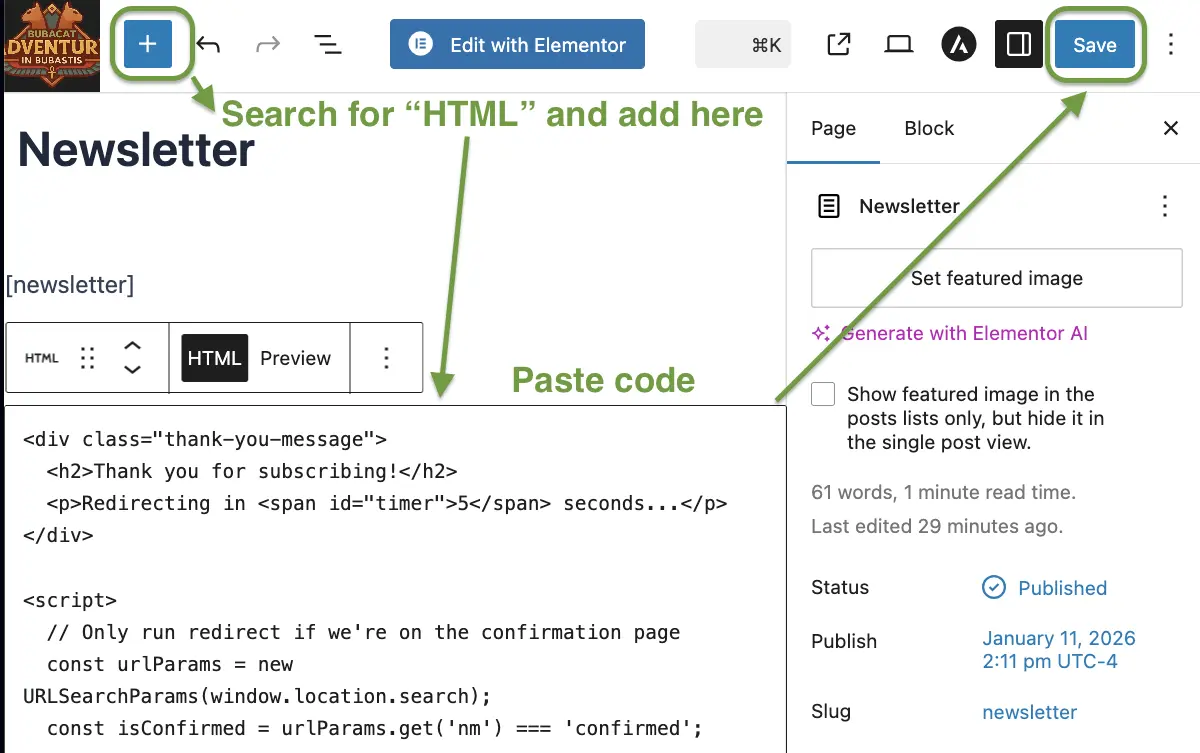
Auto-Redirect HTML code inside Newsletter page.
Step 1: Configure Redirect
Go to Pages → Newsletter → Edit
Click ✚ Add icon to add new element to your page.
Search for HTML element and click it.
Copy and Paste this code inside HTML element:
Auto-Redirect HTML code
<div class="thank-you-message">
  <h2>Thank you for subscribing!</h2>
  <p>Redirecting in <span id="timer">5</span> seconds...</p>
</div>

<script>
  // Only run redirect if we're on the confirmation page
  const urlParams = new URLSearchParams(window.location.search);
  const isConfirmed = urlParams.get('nm') === 'confirmed';

  if (isConfirmed) {
    let seconds = 5;
    const timer = document.getElementById('timer');
    const countdown = setInterval(() => {
      seconds--;
      timer.textContent = seconds;
      if (seconds <= 0) {
        clearInterval(countdown);
        location.href = '/';
      }
    }, 1000);
  } else {
    // Hide the thank you message if we're not on the confirmation page
    document.querySelector('.thank-you-message').style.display = 'none';
  }
</script>
Click Save.
Step 2: Test
Visit your subscription form.
Subscribe with a test email.
Verify redirect to home page works.
Thank You Page Ideas:
Offer a free downloadable resource (ebook, checklist, template)
Provide exclusive discount code for your products
Link to your best content or popular posts
Invite them to follow you on social media
Share what to expect from your newsletters
Pro Power-Ups: Mastering Segmentation, Imports, and Analytics
Unlock more power from your WordPress email marketing plugin.
Subscriber Lists & Segmentation
Create Targeted Lists:
Go to Newsletter → Lists
Click "Add New"
Name your list (e.g., "Blog Subscribers", "Product Updates")
Save
Use Cases:
Separate lists for different content types
Segment by interest (tech, design, business)
Create VIP subscriber list
Send to Specific Lists:
Before sending a newsletter, choose "Match at least one of" and select specific lists.
Subscriber Management
View All Subscribers:
Newsletter → Subscribers (Manage tab or All subscribers option,
depends where you are)
See full list with:
Name
Email
Subscription date
Status (Confirmed, Not confirmed, Unsubscribed)
Export / Import Subscribers Tab lets you upload or download lists of subscribers. But you
need to
install additional plugin to use it:
Go to Newsletter → Addons
Click "Download Addons Manager" button
Then click "Install" button
You're gonna be redirected to Add Plugins page (Upload Plugin section), then
choose
your previously
downloaded
Plugin *.zip and click "Install Now" button
and then click "Activate Plugin" button. Congratulations! You've installed "Newsletter -
Addons Manager and Support" plugin. Now you can install "Import and Export" addon.
Go to Newsletter → Addons manager
Scroll to the bottom of the page and find Tools section
Click on "Install Now" near "Import and Export". Wait for installation to finish.
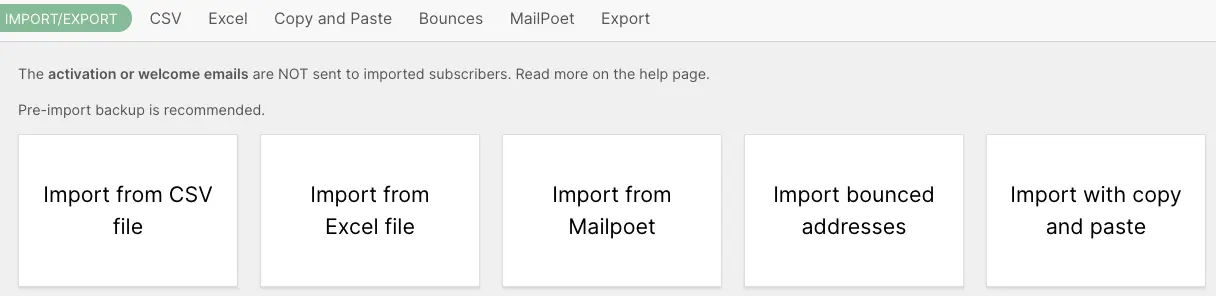
Now you can go to Newsletter → Subscribers → Import / Export tab and finally use any of
the features below:
Import and Export Subscribers tab after you installed "Newsletter -
Addons Manager and Support" and "Newsletter -
Import/Export" addons.
Analytics & Tracking
Track Newsletter Performance:
Newsletter → Newsletters
Click on any sent newsletter 📊 Statistics icon
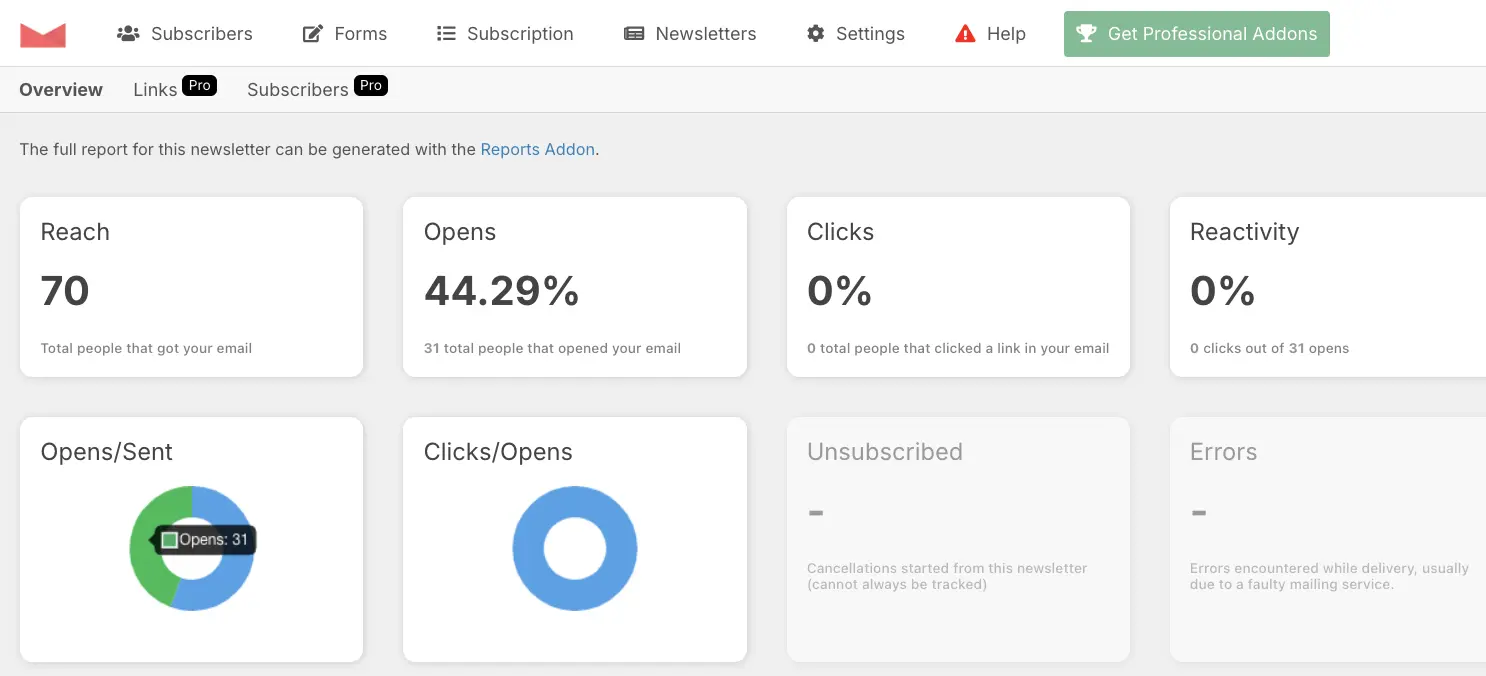
View statistics:
Newsletter Statistics Sent vs Opens
Reach: Total people that got this email
Opens: How many opened this email
Clicks: Link clicks inside this email
And so much more... Escpecially if you add "Reports and Retargeting" addon (it's premium addon,
subscriptions start from 69$ per year, but
there is 30-day money back guarantee).
Yet with free version you could still track Open rate and link clicks inside your
newsletters to make some conclusions about best practices for Subject naming and content.
GDPR Compliance
Built-in GDPR Features:
Privacy Checkbox:
Newsletter → Forms → Standard Form
Enable "Privacy"
Add link to privacy policy
Double Opt-In (if you prefer to be "Better safe than sorry". Yet
it's not required by law):
Newsletter → Subscription → Confirmation
Customize 2 Tabs: Confirmation Page message + Confirmation email with
{confirmation_url} tag inside.
Now after user typed his email and agreed to privacy policy on your site already, he will receive
a confirmation email
with confirmation link. After clicking on this link Subscribers will be moved to "Confirmed" status.
That's what Double Opt-In is.
Easy Unsubscribe:
Every email includes unsubscribe tag-link {unsubscription_url} - this is a link to
unsubscribe page, where user can unsubscribe from your newsletter.
One-click unsubscribe process tag = {unsubscription_confirm_url} - user just clicks
on
unsubscribe link and he will be unsubscribed.
Subscribers can request to See their data / Delete their data:
To send user their data - you can go to Subscribers - click on 🖌️ Edit icon next
to their email -
change
status to Complained. Then go to Export tab and choose Status Complained and click "Export" button -
this would export all their data in CSV format, that you could later send them. Just make sure
to check exported CSV file so that it wouldn't have other subscribers data inside. And change
their status back to Confirmed after you sent them their data.
Delete is much easier though - you just go to Subscribers and click on ❌ Delete
icon next to their
email. This would delete them from your database.
US Email Marketing Compliance (CAN-SPAM)
For US-based businesses, email marketing must also comply with the FTC's CAN-SPAM Act. Newsletter plugin includes required elements like:
Clear "From" identification (your domain name in sender)
Accurate subject lines (customizable in each campaign)
One-click unsubscribe links (built into every email)
Physical address in footer (add via customization)
Tech Support: Quick Fixes for Forms, SMTP, and Welcome Emails
Problem 1: Emails Not Sending
Newsletter Email sent via hosting
Solution:
Check your WordPress email settings
Install the FluentSMTP plugin and add your email provider credentials to improve email
deliverability
Test email delivery
Problem 2: Form Not Appearing
Solution:
Verify shortcode is correct: [newsletter_form]
Check page isn't cached (clear cache)
Ensure plugin is activated
Try different page builder
Problem 3: Welcome Email Not Received
Solution:
Check spam or junk folder
Verify welcome email is enabled and saved
Test with different email address
Check email logs in Newsletter → Help → Logs
Problem 4: Slow Email Sending
Solution:
Go to Newsletter → Settings → General Settings → Sending
Adjust emails per hour limit
Consider upgrading hosting if needed
Use external SMTP service for better delivery
WordPress Mailing List Plugin: Beyond Newsletters
A wordpress mailing list plugin does more than blast emails — it builds and segments a contact
list you own. The Newsletter plugin handles mailing lists, import/export of subscribers, and targeted sends to
different lists with a single free install. No third-party platform holds your data.
Best WordPress Email Subscription Plugin
The best wordpress email subscription plugin is one that turns visitors into subscribers with a
clean opt-in form plus double opt-in for GDPR. The Newsletter shortcode [newsletter_form] drops into
any page, post, or Elementor section, and the welcome-email automation starts your list on autopilot.
Frequently Asked Questions
🔥 Most Asked Questions:
Is it really free? Yes, 100% free with unlimited subscribers.
Works with Elementor? Yes, paste [newsletter_form] in Shortcode widget.
GDPR compliant? Yes, includes privacy checkboxes and consent tools.
Better than MailChimp? For free tier, yes - no subscriber limits.
Is Newsletter plugin really free?
Yes, the Newsletter plugin is 100% free with unlimited subscribers and unlimited emails. There are
premium
addons available for advanced features, but the core plugin has everything most users need.
How many subscribers can I have?
Unlimited. Unlike MailChimp (500 free limit) or MailPoet (1,000 free limit), Newsletter plugin has no
subscriber restrictions on the free version.
Can I use Newsletter plugin with Elementor?
Yes! You can add the newsletter form to any Elementor page using the Shortcode widget. Just paste
[newsletter_form] into the widget.
Does it work with Gutenberg?
Absolutely. Use the Shortcode block in Gutenberg and paste [newsletter_form] to display the
subscription form.
Is Newsletter plugin GDPR compliant?
Yes. "The plugin includes privacy checkboxes and double opt-in confirmation to meet GDPR email marketing
requirements, ensuring your newsletter complies with European data protection laws."
Can I import subscribers from MailChimp?
Yes. Export your subscribers from MailChimp as a CSV file, then use Newsletter's import feature to
upload
them. Make sure to map the fields correctly (Name, Email).
Why are my emails going to spam?
WordPress's default email function can be unreliable. Install the FluentSMTP plugin
and configure it
with a proper SMTP service (Gmail, SendGrid, etc.) to improve deliverability.
Can I schedule newsletters?
Yes. When creating a newsletter, you can choose to send immediately or schedule it for a specific date
and
time.
How do I customize the form design?
You can customize the form using CSS. Go to Appearance → Customize → Additional CSS and add your custom
styles for the form fields and buttons.
Can I send newsletters to specific groups?
Yes. Create multiple lists (Newsletter → Lists) and assign subscribers to different lists. When sending
a
newsletter, you can choose which lists to send to.
Does Newsletter plugin slow down my website?
No. The plugin is lightweight and well-optimized. It only loads necessary resources on pages where the
subscription form is displayed.
Can I track email opens and clicks?
Yes. The plugin includes analytics showing opens, clicks, bounces, and unsubscribes for each newsletter
you send.
Newsletter Plugin and SEO: Building Your Content Strategy
Email lists and SEO work together. Google's helpful content guidelines emphasize building an engaged audience - which an
email
newsletter helps achieve. Subscribers become repeat visitors, improving your dwell time and engagement metrics
that Google values.
Use Newsletter plugin to:
Alert subscribers to new blog posts (increasing traffic)
Share popular content (boosting page views and time on site)
Gather user feedback (improving content quality)
Build brand loyalty (increasing direct traffic, a ranking signal)
This creates a virtuous cycle: better content → more subscribers → more traffic → higher rankings → more
subscribers.
If you've been searching for mailchimp alternatives for wordpress, you probably already know
the main options: MailPoet, Newsletter plugin, Brevo (ex-Sendinblue), and Mailster. Of all of them, Newsletter
plugin is the only one with zero subscriber limits on the free version. MailPoet caps you at 500 (that's the
mailpoet free plan subscriber limit 2026). Brevo caps your daily sends. Mailster is a paid
plugin from the start. So for most WordPress sites, Newsletter plugin is the best mailchimp
alternative wordpress has to offer — and the top pick among all free mailchimp alternatives
wordpress users recommend — especially if you want to keep costs at zero.
Final Thoughts
The Newsletter plugin is one of the best free WordPress newsletter plugins available in
2026 — and the top MailChimp alternative for WordPress with no subscriber limits.
With unlimited subscribers, unlimited emails, and powerful features like automation and analytics,
it's perfect for bloggers, small businesses, and growing websites.
Unlike premium services like MailChimp or MailPoet, you won't hit subscriber limits or monthly fees.
Your subscriber data stays in your WordPress database, giving you complete control.
Honestly, I've tried a bunch of email tools and nothing beats this for a free WordPress setup. You own your
list. You control your emails. You pay nothing. That's the whole point.
If you're just starting out - install it today. If you're currently paying for MailChimp or MailPoet -
switch. The migration takes maybe 30 minutes and you'll never look back. Just export your subscriber list as
a CSV, import it into Newsletter plugin, and you're done.